Eclipse Installation Step-by-Step guide to Install
Eclipse and Get run with Java Programming on Windows
Free Eclipse Installation step-by-step Quick reference e-Book in PDF
Eclipse is open source cross platform Integrated Development Tool (IDE), Eclipse supports JAVA SE, JAVA EE, JAVA ME, JAVA TV, C/C++, Python, JSON , PHP to develop Standalone Application, Android apps, Micro Embedded applications, Web Applications and Webservices. Eclipse is cross platform can run under Windows, Linux and Mac OS.
Prerequisites for Eclipse


Once your download has completed, you could see eclipse-inst-win64.exe in your downloaded path.
Step 3: Double click the eclipse-inst-win64.exe, below screen will be appeared to Run, you can proceed to click Run button.

Step
5: Choose
your installation path and click install button.


Free Eclipse Installation step-by-step Quick reference e-Book in PDF
Eclipse is open source cross platform Integrated Development Tool (IDE), Eclipse supports JAVA SE, JAVA EE, JAVA ME, JAVA TV, C/C++, Python, JSON , PHP to develop Standalone Application, Android apps, Micro Embedded applications, Web Applications and Webservices. Eclipse is cross platform can run under Windows, Linux and Mac OS.
Prerequisites for Eclipse
Installing Eclipse is simply easy but does
involve a few steps, Eclipse is a Java-based application and, as such, requires
a Java runtime environment (JRE) in order to run.
Irrespective of your operating system, you
will need to install Java virtual machine (JVM). You may also install a Java
Runtime Environment (JRE), or a Java Development Kit (JDK), depending on what
you want to do with Eclipse.
If you plan to use Eclipse for Java
development, then you should install a JDK. If you aren't planning to use
Eclipse for Java development and want to save some disk space, install a JRE.
For installing JAVA refer this link.
Eclipse
for JAVA Installation step-by-step
Step
1: Get
your favorite Eclipse packages from eclipse.org page. Eclipse latest version
can be downloaded from this link.

Why
Eclipse Oxygen?
The Eclipse Oxygen release includes many
improvements in functionality and performance, includes new tools for Java code
coverage analysis, and can be extended to support Java 9 and above development.
You can find more details here to refer Eclipse Oxygen release documents.
Step
2:
Click Download 64 bit button under
the Oxygen section, following screen will be appeared. You can choose a mirror
close to you for fast download by clicking the >>Select another Mirror link.

Once your download has completed, you could see eclipse-inst-win64.exe in your downloaded path.
Step 3: Double click the eclipse-inst-win64.exe, below screen will be appeared to Run, you can proceed to click Run button.

Eclipse installer screen will be shown the
progress….
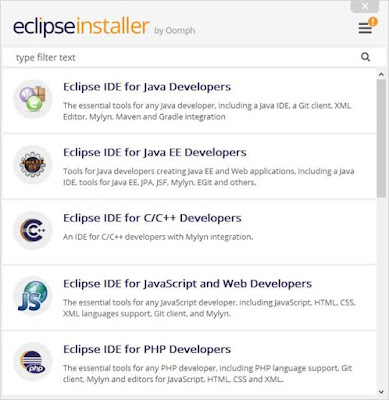
Step 4: Select your installer from the list, For JAVA development, you can choose ‘Eclipse IDE for JAVA Developers’ .
Step 4: Select your installer from the list, For JAVA development, you can choose ‘Eclipse IDE for JAVA Developers’ .


Step 6: Provide your acceptance for Eclipse
License Agreement.

Installation has started for ‘Eclipse IDE for JAVA Developers’
.

Step 7: After Installation has been completed,
Click launch button.

Step
8:
Select a directory as workspace and click launch button

Eclipse Oxygen will be loading in your
machine.
Welcome screen will be display to take you
with few tutorials for understating to work on Eclipse.

Well done! You have successfully completed
to set-up Eclipse environment in your Windows system.
Thanks for reading.
Free Eclipse Installation step-by-step Quick reference e-Book in PDF
Top 3 Devops article:
Thanks for reading.
Free Eclipse Installation step-by-step Quick reference e-Book in PDF
Top 3 Devops article:
- DevOps Automation Framework for CI/CD Pipeline Read more...
- DevOps FAQ | Process | DevOps Development Environment Read more...
- Jenkins Tutorial | Jenkins FAQ | Jenkins Installation | Continuous Integration Read more...
Search Keyword : Eclipse Install, eclipse integrated development environment., eclipse latest version download, eclipse the eclipse foundation open source community website, official eclipse website, Run Java in Eclipse, Eclipse Java.
No comments:
Post a Comment